Introduction
Cuppa Cuppa Cake is a vintage fruit dessert that combines the tender texture of a cake with the warm, juicy consistency of a homemade cobbler.
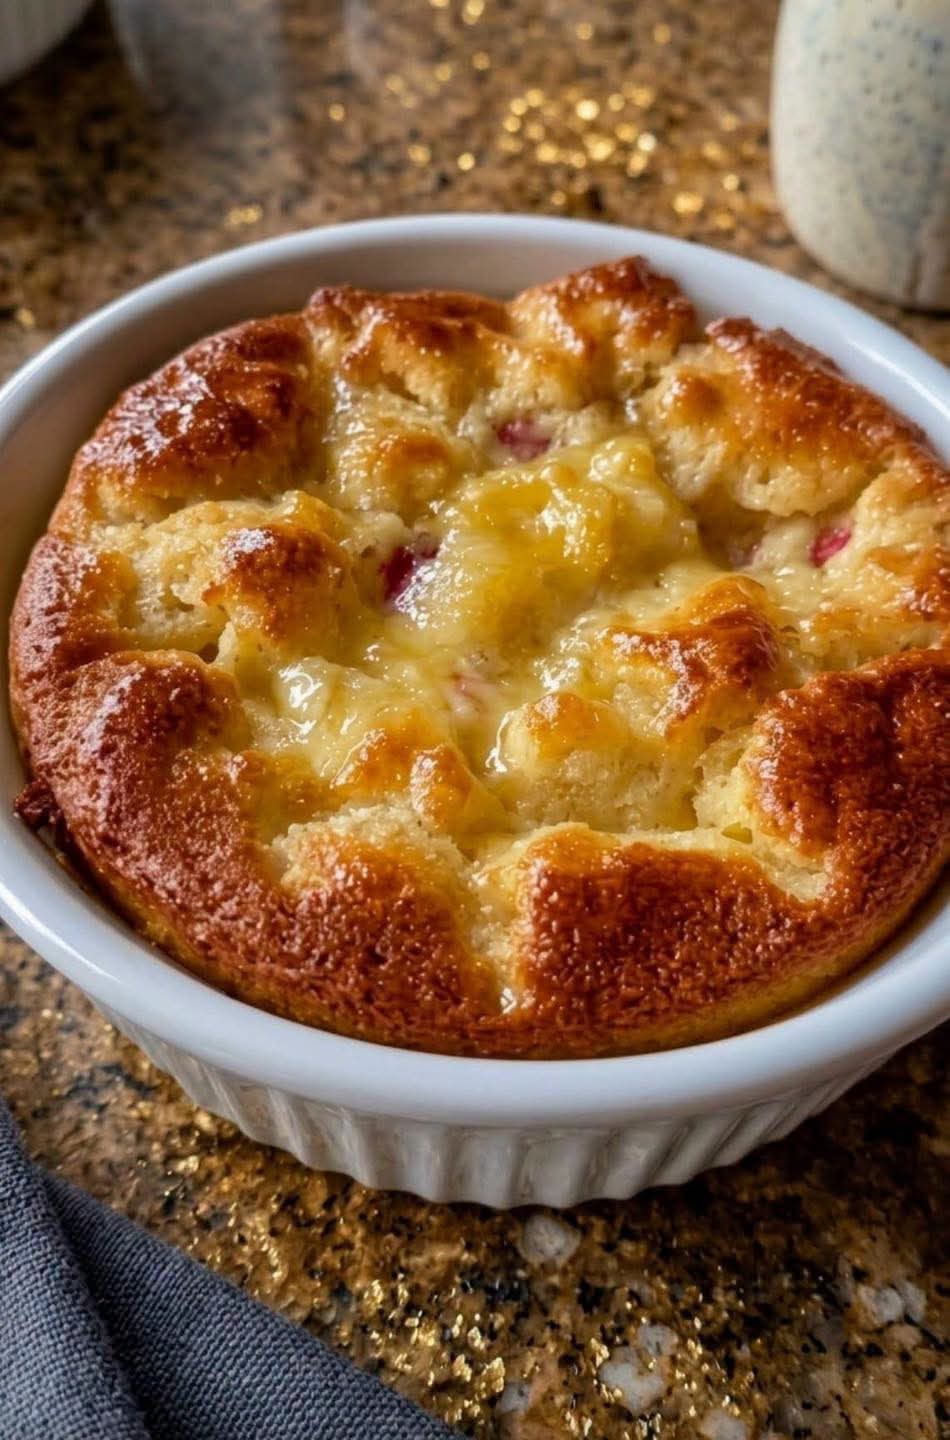
The unusual name comes from the original equal-cup formula: one cup of self-rising flour, one cup of granulated sugar, and fruit with its juice. Butter melts across the surface during baking, creating the deep golden crust shown in the image.
This easy dessert recipe requires approximately five minutes of preparation and uses inexpensive grocery-store ingredients. It is perfect for busy weeknights, family dinners, potlucks, holiday gatherings, or last-minute entertaining.
Serve the cake warm with vanilla ice cream or whipped cream for a comforting homemade dessert that requires no electric mixer and almost no cleanup.
Recipe Overview
Recipe detail Information
Preparation time 5 minutes
Baking time 35–40 minutes
Cooling time 10 minutes
Total time Approximately 50–55 minutes
Servings 6
Oven temperature 350°F (175°C)
Baking dish 9-inch pie dish or cake pan
Difficulty Very easy
Recipe type Fruit cake and cobbler-style dessert
Best served Warm
Why You’ll Love This Recipe
Cuppa Cuppa Cake uses only four main ingredients, making it an affordable dessert for families managing their weekly grocery budget.
The batter can be prepared in one mixing bowl without an electric mixer, food processor, or specialized baking equipment.
Canned fruit cocktail provides the fruit and most of the liquid required for the batter. This convenient pantry ingredient makes the dessert possible throughout the year.
The contrast between the soft fruit-filled center and the caramelized buttery crust makes every serving satisfying.
This recipe is also flexible. You can use peaches, pears, crushed pineapple, or another canned fruit when fruit cocktail is unavailable.
Because preparation takes only a few minutes, it is a practical last-minute dessert for unexpected guests, Sunday dinner, or holiday entertaining.
Ingredients
Main Ingredients
Ingredient Quantity Notes
Self-rising flour 1 cup Measure using the spoon-and-level method
Granulated sugar 1 cup Provides sweetness and browning
Canned fruit cocktail in juice One 15-ounce can Do not drain
Unsalted butter ¼ cup or 4 tablespoons Cut into small pieces
Optional Serving Ingredients
Ingredient Suggested quantity
Vanilla ice cream 1 scoop per serving
Whipped cream 2 tablespoons per serving
Powdered sugar A light dusting
Ground cinnamon A small pinch
The four principal ingredients are enough to make the complete cake. Ice cream, whipped cream, powdered sugar, and cinnamon are optional serving additions.
Step-by-Step Instructions
Step 1: Preheat the Oven
Preheat the oven to 350°F (175°C).
Position an oven rack in the center so the cake receives even heat from above and below.
Step 2: Prepare the Baking Dish
Generously grease the bottom and sides of a 9-inch pie dish or round cake pan with butter or nonstick cooking spray.
Place the baking dish on a rimmed baking sheet if it is shallow. The baking sheet will catch any buttery fruit syrup that bubbles over the edge.
Step 3: Combine the Dry Ingredients
Add the self-rising flour and granulated sugar to a large mixing bowl.
Stir them briefly with a whisk or wooden spoon to distribute the sugar evenly through the flour.
Step 4: Add the Fruit Cocktail
Pour the entire can of fruit cocktail into the bowl, including all the juice.
The canned fruit juice is essential because it hydrates the flour and creates the cake batter. Do not drain the fruit.
Step 5: Mix the Batter
Gently fold the ingredients together with a spatula or wooden spoon.
Stop mixing as soon as no dry patches of flour remain. The batter will be thick, moist, and filled with visible pieces of fruit.
Avoid aggressive mixing because it can develop too much gluten and produce a tough cake.
Step 6: Transfer the Batter
Pour the fruit batter into the prepared baking dish.
Use a spatula to distribute it evenly, making sure the fruit is not concentrated in only one section of the pan.
Step 7: Add the Butter
Cut the butter into small cubes or thin slices.
Arrange the butter evenly across the surface of the uncooked batter. Even distribution helps the entire top become crisp, buttery, and golden.
Step 8: Bake the Cake
Bake on the center oven rack for 35–40 minutes.
The cake is ready when the surface is deeply golden, the edges are bubbling, and the center appears set rather than wet.
If necessary, insert a toothpick into a section of cake without a piece of fruit. A few moist crumbs are acceptable, but the toothpick should not be coated in raw batter.
Step 9: Cool and Serve
Remove the baking dish from the oven and let the cake rest for at least 10 minutes.
This short resting period allows the hot fruit syrup to thicken and makes the dessert easier to serve.
Spoon it into bowls while warm and add vanilla ice cream or whipped cream if desired.
Best Tips
Do not drain the canned fruit. Its juice replaces the milk or water normally used in a cake batter.
Use self-rising flour rather than plain all-purpose flour. Self-rising flour already contains the leavening and salt needed to help this dense fruit batter rise.
Measure the flour correctly. Spoon it into the measuring cup and level the surface without packing it down.
Mix only until the flour disappears. Overmixing can make the finished dessert dense and rubbery instead of soft and tender.
Cut the butter into small pieces and spread them across the entire surface. Large pieces concentrated in one area can leave dry patches elsewhere.
Let the cake rest before serving. The center will be extremely hot immediately after baking, and the fruit filling needs several minutes to settle.
Best Ingredient Options
Self-Rising Flour
Commercial self-rising flour produces the most dependable texture because the baking powder and salt are already evenly distributed.
If it is unavailable, prepare a substitute by combining 1 cup all-purpose flour, 1½ teaspoons baking powder, and ¼ teaspoon salt.
Whisk this mixture thoroughly before adding the sugar and fruit.
Canned Fruit
Fruit cocktail creates the colorful, old-fashioned version visible in the image.
Canned peaches are a good choice for a sweeter Southern-style dessert, while crushed pineapple provides a brighter tropical flavor.
Pears produce a mild, delicate cake, and canned cherries create a richer dessert suitable for holidays.
Choose fruit packed in juice or light syrup. Heavy syrup can make the cake considerably sweeter.
Butter
Unsalted butter allows better control over the final flavor.
Salted butter can also be used. If you prepare homemade self-rising flour with salted butter, slightly reduce the added salt.
Recipe Variations
For a peach Cuppa Cuppa Cake, replace the fruit cocktail with one 15-ounce can of diced or sliced peaches. Keep the juice and cut large slices into smaller pieces.
For a pineapple variation, use a 15-ounce can of crushed pineapple with its juice. Pineapple gives the dessert a bright flavor and an especially moist texture.
For a warm autumn version, add ½ teaspoon of ground cinnamon and a small pinch of nutmeg to the flour and sugar.
For additional texture, scatter ⅓ cup of chopped pecans or walnuts over the batter before adding the butter.
For a coconut fruit cake, add ¼ cup of sweetened shredded coconut to the batter.
For extra flavor, mix 1 teaspoon of vanilla extract into the fruit before combining it with the dry ingredients.
What to Serve With Cuppa Cuppa Cake
Vanilla ice cream is the classic accompaniment. The cold, creamy ice cream contrasts beautifully with the warm fruit and buttery crust.
Freshly whipped cream provides a lighter topping while still adding richness.
Serve the cake with coffee or hot tea for an easy afternoon dessert.
Fresh berries can add color and a slightly tart flavor that balances the sweetness.
For a simple presentation, dust each serving lightly with powdered sugar immediately before bringing it to the table.
Make-Ahead Instructions
Cuppa Cuppa Cake can be baked one day before serving.
Let it cool completely, cover the baking dish, and refrigerate it. Reheat the dessert gently before serving to restore its soft center and buttery flavor.
The dry ingredients may also be combined in advance and stored in an airtight container.
Do not mix the canned fruit with the flour until you are ready to bake. Once the batter is combined, it should go into the preheated oven promptly.
Storage
Allow the cake to cool completely before covering it.
Store it at room temperature for up to one day if your kitchen is cool. Because the dessert contains moist fruit, refrigeration is the safer option for longer storage.
Refrigerate leftovers in an airtight food-storage container for up to four days.
Keeping the dessert tightly covered prevents the exposed cake from drying out and absorbing odors from other refrigerated foods.
Reheating
Microwave an individual serving for approximately 15–25 seconds, depending on its size.
To reheat several portions, cover the baking dish loosely with aluminum foil and place it in a 300°F (150°C) oven for 10–15 minutes.
Remove the foil during the final few minutes if you want to refresh the golden crust.
Do not overheat the cake because the fruit filling can become extremely hot.
Freezing
Let the cake cool completely before freezing.
Divide it into individual portions and wrap each piece tightly in plastic wrap. Place the wrapped portions in a freezer-safe container or resealable freezer bag.
Freeze for up to three months.
Thaw individual portions overnight in the refrigerator before reheating. The crust may become slightly softer after freezing, but the fruit-filled interior should remain moist.
Common Mistakes to Avoid
Draining the fruit is the most significant mistake. Without the canned juice, there will not be enough liquid to form a proper batter.
Using regular flour without adding baking powder and salt can produce a heavy, flat dessert.
Overmixing develops gluten and can change the cake from soft and tender to chewy.
Placing all the butter in the center prevents the crust from browning evenly. Spread small pieces over the complete surface.
Using a baking dish that is too small can cause the bubbling fruit mixture to overflow.
Removing the cake too early may leave uncooked batter in the center. Look for a golden surface, bubbling edges, and a set center.
Serving it immediately from the oven can cause the hot filling to run excessively. Allow at least 10 minutes of cooling time.
Nutrition Estimate
Nutrient Estimated amount per serving
Calories 365 kcal
Protein 3 g
Carbohydrates 68 g
Dietary fiber 1 g
Total sugar 49 g
Total fat 10 g
Saturated fat 6 g
Sodium 290 mg
The nutrition information is an estimate for six servings and does not include ice cream, whipped cream, nuts, or other optional toppings.
Frequently Asked Questions
Why is it called Cuppa Cuppa Cake?
The name comes from the traditional equal-cup formula of one cup of flour and one cup of sugar combined with canned fruit.
Is Cuppa Cuppa Cake actually a cake or a cobbler?
It falls somewhere between the two. It has a cake-like batter but remains moist and fruity like a cobbler.
Can I use fresh fruit?
This specific recipe depends on the juice from canned fruit. Fresh fruit alone will not provide enough liquid.
To use fresh fruit, you would need to add a measured amount of juice or another liquid, which changes the original formula.
Can I reduce the sugar?
You can reduce the granulated sugar to ¾ cup, particularly when using fruit packed in syrup.
Reducing it further may affect the texture, browning, and crispness of the crust.
Why did my cake turn out dense?
The most common causes are expired self-rising flour, too much measured flour, or overmixing the batter.
Can I use a different baking dish?
Yes. A 9-inch pie dish, 9-inch round cake pan, or similar 2-quart baking dish will work.
The baking time may need to be adjusted if the batter is significantly deeper or shallower.
How do I know when it is fully baked?
The surface should be golden brown, the fruit should bubble around the edges, and the center should appear set.
Should Cuppa Cuppa Cake be refrigerated?
Refrigeration is recommended when storing it for longer than one day because of its high moisture and fruit content.
Final Thoughts
Cuppa Cuppa Cake is an easy, affordable dessert that delivers the comforting flavor of homemade baking without complicated preparation or expensive equipment.
The canned fruit creates a soft, juicy center, while the butter produces the deeply golden crust shown in the image.
With only four principal ingredients and five minutes of preparation, this vintage fruit cake is ideal for family dinners, potlucks, holiday entertaining, and last-minute dessert cravings.