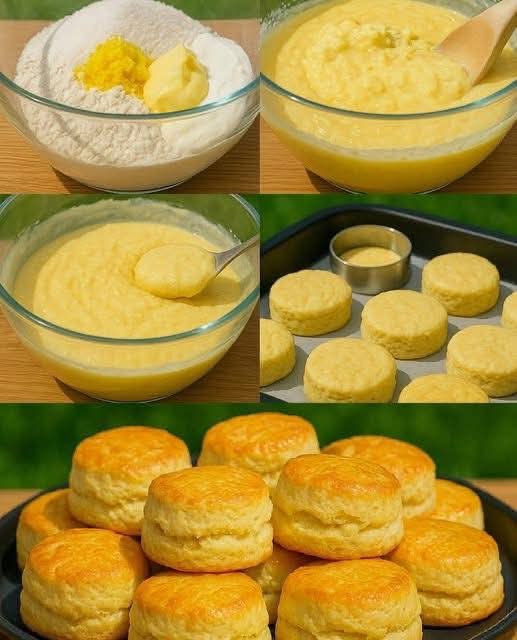
Extra-Buttery Classic Biscuits: The Ultimate Flaky, Easy Homemade Recipe
There’s something almost magical about a warm, flaky biscuit fresh from the oven. It’s the kind of comfort food that brings people together, evokes memories of cozy mornings, and turns an ordinary meal into a cherished culinary experience. Whether you’re an experienced baker or just starting your journey in the kitchen, this classic buttery biscuit recipe is designed to deliver perfect results every single time—golden, tender, and impossibly rich.
This isn’t just another biscuit recipe. It’s a carefully honed method that maximizes buttery flavor and achieves those coveted, melt-in-your-mouth layers without any complicated techniques. If you’re passionate about traditional recipes and love creating memorable home-cooked meals, this is the one you’ll want to bookmark, print, and pass down.
Why These Buttery Biscuits Are a Game-Changer
There’s no shortage of biscuit recipes out there, but this one stands apart for a few key reasons. First, the ratio of butter to flour is generous, ensuring that unmistakable, rich flavor in every bite. Second, the technique is approachable for bakers of all skill levels. And third, these biscuits are incredibly versatile—perfect for breakfast, brunch, dinner, or even as the foundation for a hearty sandwich.
If you’re into meal planning and healthy meal prep, you’ll appreciate how easily these biscuits fit into a weekly rotation. They freeze beautifully, reheat in minutes, and pair with almost anything. Plus, making them from scratch gives you full control over the ingredients, which is a cornerstone of any healthy eating lifestyle.
For families, these biscuits are a game-changer. They’re kid-friendly, budget-conscious, and can be made in large batches. If you’re always on the lookout for family-friendly meal plans, this recipe deserves a permanent spot in your repertoire.
The Secret to Extra-Buttery Flakiness
Achieving flaky, layered biscuits isn’t about luck—it’s about understanding a few core principles. The most important is temperature. Your butter and buttermilk must be very cold when they go into the oven. As the cold butter melts in the hot oven, it creates steam, which pushes the dough apart and forms those beautiful, airy layers. This is the same principle behind puff pastry and croissants.
Another critical factor is handling. Overworking the dough develops gluten, which leads to tough, dense biscuits instead of light and tender ones. The folding technique described in this recipe is the secret to creating distinct layers without overdeveloping the gluten. It’s a gentle process that rewards patience and a light touch.
Finally, the type of butter matters. Unsalted butter gives you control over the sodium level, and its rich, creamy flavor is unmatched. If you’re a fan of fine wines and appreciate nuanced flavors in your food, you’ll understand why high-quality butter makes such a difference.
Ingredients
Here’s what you’ll need to make approximately 8-10 biscuits:
· 2 cups (240g) all-purpose flour, plus more for dusting
· 1 tablespoon baking powder
· 1 teaspoon granulated sugar (optional, for a touch of sweetness)
· 1/2 teaspoon salt
· 8 tablespoons (1 stick or 113g) unsalted butter, very cold and cut into 1/2-inch cubes
· 3/4 cup (180ml) cold buttermilk (or milk with 1 tablespoon lemon juice/vinegar, let sit 5 minutes)
· 1 large egg, for egg wash (optional, for golden-brown tops)
· 1 tablespoon water, for egg wash (optional)
Pro Tip: If you’re exploring meal planning tools, you can easily scale this recipe up or down. The ingredient ratios are simple and forgiving, making it perfect for batch cooking and healthy meal prep sessions.
Instructions
1. Preheat Your Oven
Preheat your oven to 425°F (220°C). Line a baking sheet with parchment paper or a silicone baking mat. A hot oven is essential for getting that initial rise and golden-brown crust.
2. Combine Dry Ingredients
In a large bowl, whisk together the flour, baking powder, sugar (if using), and salt. Make sure everything is evenly distributed.
3. Cut in the Cold Butter
Add the very cold, cubed butter to the dry ingredients. Using a pastry blender, two knives, or your fingertips, cut the butter into the flour mixture until it resembles coarse crumbs with some pea-sized pieces of butter remaining. This step is crucial for flaky biscuits, so work quickly to keep the butter cold. If your kitchen is warm, you can even pop the bowl into the freezer for 5-10 minutes if the butter starts to soften too much.
4. Add the Buttermilk
Make a well in the center of the flour and butter mixture. Pour in the cold buttermilk. Stir gently with a fork or rubber spatula until just combined. The dough should still look shaggy and a little dry in places. Avoid overmixing, as this can lead to tough biscuits.
5. Fold for Layers
Turn the dough out onto a lightly floured surface. Gently bring the dough together into a cohesive mass. Do not knead vigorously. To create layers, gently pat the dough into a rectangle, about 1-inch thick. Fold one-third of the dough over the middle, then fold the other third over that (like folding a letter). Rotate the dough 90 degrees and repeat the patting and folding process 2-3 more times. This gentle folding helps build those beautiful, flaky layers without developing too much gluten.
6. Cut the Biscuits
Pat the dough out to about 3/4-inch to 1-inch thickness. Using a 2-inch or 2.5-inch biscuit cutter, cut straight down into the dough. Do not twist the cutter, as twisting can seal the edges and prevent the biscuits from rising properly. Place the cut biscuits onto the prepared baking sheet, spacing them about 1 inch apart for crispier edges, or closer together for softer sides. Gather any dough scraps, gently press them together, and cut out any remaining biscuits.
7. Add the Egg Wash
If using an egg wash, whisk the egg with 1 tablespoon of water in a small bowl. Gently brush the tops of the biscuits with the egg wash for a golden-brown finish.
8. Bake to Perfection
Bake for 12-15 minutes, or until the tops are golden brown and the biscuits are cooked through. The exact baking time may vary depending on your oven.
9. Cool and Serve
Remove from the oven and let cool slightly on the baking sheet before serving warm.
Pro Tips for Perfect Biscuits
Keep Everything Cold: The importance of cold ingredients cannot be overstated. You can even chill your flour and mixing bowl for 10-15 minutes before starting.
Handle with Care: Overmixing or overworking the dough develops gluten, which leads to tough biscuits. Once the wet ingredients are added, mix only until just combined.
Don’t Twist the Cutter: Press straight down with your cutter. Twisting seals the edges, preventing the biscuit from rising fully.
Invest in a Pastry Blender: It makes cutting in the butter much easier and faster, keeping the butter cold.
Use a Hot Oven: A hot oven helps the biscuits rise quickly and creates a beautiful golden-brown crust. If your oven temperature is too low, the butter will melt out before the biscuits have a chance to set, resulting in flat, greasy biscuits.
Delicious Variations
Savory Cheddar and Chive: Add 1/2 cup of shredded sharp cheddar cheese and 1 tablespoon of chopped fresh chives or dill to the dry ingredients. A pinch of garlic powder or onion powder can also enhance the savory profile.
Sweet Cinnamon Sugar: Increase the sugar to 2 tablespoons and add 1/2 teaspoon of cinnamon to the dry ingredients. Perfect for serving with coffee.
Herb-Infused: Incorporate dried herbs like rosemary or thyme for an aromatic biscuit that pairs wonderfully with roasted meats or soups.
Buttermilk Ranch: Add 1 tablespoon of ranch seasoning mix to the dry ingredients for a tangy, crowd-pleasing twist.
Storage and Reheating
Storing: Once baked and cooled, place cooled biscuits in an airtight container at room temperature for up to 2-3 days. If you need to store them for longer, you can refrigerate them for up to a week. For optimal freshness, avoid storing them in the refrigerator unless absolutely necessary, as the cold air can dry them out slightly.
Freezing: Biscuits freeze beautifully. Once completely cooled, place them in a freezer-safe bag or airtight container, separating layers with parchment paper to prevent sticking. They can be frozen for up to 2-3 months.
Reheating: The best method for reheating is in the oven. Preheat your oven to 300-325°F (150-160°C). Place the biscuits on a baking sheet and heat for 5-10 minutes if they are thawed, or 15-20 minutes if frozen, until they are warmed through and softened. You can also wrap them loosely in foil to prevent them from drying out.
Frequently Asked Questions
Why are my biscuits tough or hard?
Tough biscuits are almost always a result of overworking the dough. When you mix or knead the dough too much, you develop the gluten in the flour, which creates a chewy, bread-like texture instead of a tender, flaky one.
Can I use regular milk instead of buttermilk?
Yes, you can! Buttermilk provides a slightly tangy flavor and reacts with the baking powder to create a lighter, more tender biscuit. If you don’t have buttermilk, add 1 tablespoon of lemon juice or white vinegar to a liquid measuring cup, then fill the rest of the cup with regular milk until it reaches the 3/4-cup mark. Let it sit for 5 minutes until it slightly curdles.
How do I get flaky layers in my biscuits?
Flaky layers come from two main factors: very cold butter and proper dough handling. The cold butter creates pockets of steam as it melts in the hot oven, pushing the layers apart. The folding technique also helps to build these distinct layers.
Can I make the biscuit dough ahead of time?
Yes, you can prepare biscuit dough in advance. After cutting the biscuits, place them on a parchment-lined baking sheet and cover them loosely with plastic wrap. You can refrigerate them for up to 12-24 hours. You can also freeze cut biscuits on a baking sheet until solid, then transfer them to a freezer-safe bag for up to 2-3 months.
Serving Suggestions
These classic buttery biscuits are the ultimate versatile side. Serve them warm with a dollop of jam and butter for a quintessential breakfast or brunch treat. They’re also an ideal accompaniment to hearty soups and stews, soaking up every last drop of flavorful broth.
For a truly indulgent experience, split them open and smother them with creamy sausage gravy, or use them as the foundation for a delicious breakfast sandwich with eggs, cheese, and bacon. They also pair beautifully with quick dinner ideas like roasted chicken or a hearty chili. If you’re looking for easy chicken recipes to serve alongside, consider a simple roast chicken or a creamy chicken pot pie.
For those who enjoy fine wines, these biscuits are excellent with a crisp white or a light red. The buttery richness of the biscuits complements the acidity of the wine beautifully.
Conclusion
Making perfect, extra-buttery biscuits at home is one of the most rewarding baking experiences. With just a few simple ingredients and a little bit of technique, you can create something truly special that will impress family and friends alike.
Whether you’re an experienced home cook or just beginning your culinary journey, this recipe is designed to be approachable, reliable, and endlessly customizable. It’s the kind of recipe that becomes a staple in your kitchen, one that you’ll return to again and again for cozy mornings, holiday gatherings, and everyday meals.
So preheat your oven, gather your ingredients, and get ready to enjoy the best buttery biscuits you’ve ever made. Your kitchen will smell incredible, your taste buds will thank you, and you’ll wonder why you ever bought store-bought biscuits in the first place.